Microsoft Office includes Trust Center, which contains security & privacy settings, to keep your Windows computer secure & safe. Using the File Block feature, you can prevent outdated file types or suspicious files from opening, and open them in Protected View. There may be cases where you trust some files – especially those with macros, data connections, ActiveX controls – completely and do not want them to be checked by Trust Center, every time you open them – or you may not want them opened in Protected View. In such cases, rather than changing the default Trust Center settings to a less-safe macro security setting, it is better to move such files to a Trusted Location.
Trusted Locations in Office
If you do not want Office files to be checked by Trust Center or opened in Protected View, add them to Trusted Locations. You can add trusted locations, in any Microsoft Office document like Access, Excel, Visio, Word and PowerPoint, by following this procedure.
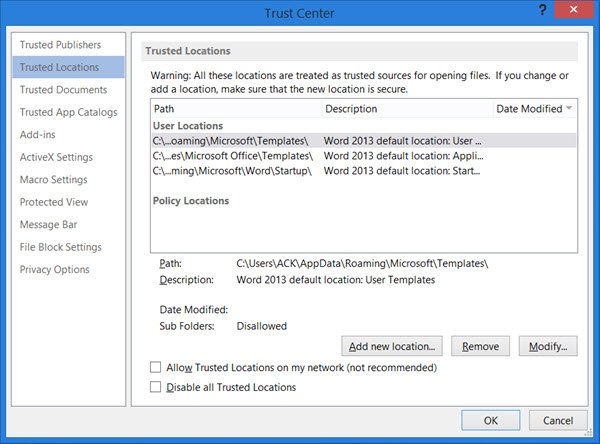
Open any Office document – say WordClick on File > Options.Next click Trust CenterGo to Trust Center Settings > Trusted Locations.Here you will see buttons that let you Add new location, Remove it or Modify them.To add a new location, click Add a trusted location, click Browse, select the folder and click OK.To remove a trusted location, select the location to be removed, click Remove button and then click OK.To modify it, click on the Modify button, and make the modifications. Finally click OK and exit.
You even have options to allow Trusted Locations on your networks or disable all Trusted Locations, by checking the boxes.
How to enable or disable Trusted Locations in Microsoft Office
We have seen how to add, remove or modify Trusted Locations in Microsoft Office apps. However, if you do not want to use this functionality at all, you can disable it on your computer. For your information, it is possible to enable or disable Trusted Locations in Microsoft Office apps using in-built settings or the Options panel, Local Group Policy Editor, and the Registry Editor. Here, we have shown the steps for Microsoft Excel. However, you can do the same in Word and PowerPoint as well. To enable or disable Trusted Locations in Microsoft Office, follow these steps: To learn more about these steps, continue reading. First, you need to open Microsoft Excel or any other Microsoft Office app and click on the Options menu. Then, go to the Trust Center tab, click on the Trust Center Settings button, and switch to the Trusted Locations tab.
Then, tick the Disable all Trusted Locations checkbox and click the OK button. Note: If you want to revert to the original setting, you need to open the same setting in the Local Group Policy Editor and choose the Not Configured option.
How to enable or disable Trusted Locations in Microsoft Office using Group Policy
To enable or disable Trusted Locations in Microsoft Office using Group Policy, follow these steps: Let’s find out more about these steps. To get started, open the Local Group Policy Editor by pressing Win+R > typing gpedit.msc and pressing the OK button. Then, navigate to this path: Word: User Configuration > Administrative Templates > Microsoft Word 2016 > Word Options > Security > Trust Center > Trusted Locations Excel: User Configuration > Administrative Templates > Microsoft Excel 2016 > Excel Options > Security > Trust Center > Trusted Locations PowerPoint: User Configuration > Administrative Templates > Microsoft PowerPoint 2016 > PowerPoint Options > Security > Trust Center > Trusted Locations Double-click on the Disable all trusted locations setting and choose the Enabled option.
Then, click the OK button to save the change.
How to enable or disable Trusted Locations in Microsoft Office using Registry
To enable or disable Trusted Locations in Microsoft Office using Registry, follow these steps: Let’s check out more about these steps. First, press Win+R > type regedit > press the Enter button and click the Yes button to open the Registry Editor on your computer. Then, navigate to this path: Right-click on excel > New > Key and name it as security. Then, right-click on security > New > Key and name it as trusted locations.
Following that, right-click on trusted locations > New > DWORD (32-bit) Value. You need to name it as alllocationsdisabled.
As you want to disable the Trusted Locations feature, you need to double-click on it and set the Value data as 1.
Finally, click the OK button, close all windows, and restart your computer. Note: If you are unable to navigate to the mentioned path, you need to create it manually. Secondly, if you want to set the default settings, you need to delete the alllocationsisabled REG_DWORD value. For that, right-click on it, choose the Delete option, and click the OK button.
How do I change my trusted location?
To change the trusted location in Office 365, you need to open the Options panel first. Then, switch to the Trust Center tab on the left side and click on the Trust Center Settings button. After that, go to the Trusted Locations and click the Add new location button. Now, you can choose the new trusted location and click the OK button.
How do I add a trusted location in Excel?
To add a trusted location in Excel, open the app and click the Options first. Then, go to the Trust Center tab and click the Trust Center Settings button. Following that, switch to the trusted Locations tab and click the Add new location button. Choose a location and save the changes by clicking the OK button. Before you add any location, make sure that the new location is completely secure.