Harden Windows Defender protection in Windows 11/10
Run gpedit.msc to open the Group Policy Editor and navigate to the following path: Computer Configuration > Administrative Templates > Windows Components > Windows Defender Antivirus > Maps
Here you will see 4 settings:
Join Microsoft MapsConfigure Block at First Sight featureConfigure local setting override for reporting to Microsoft MAPSSend file samples when further analysis is required.
You can configure Windows Defender settings according to your requirements.
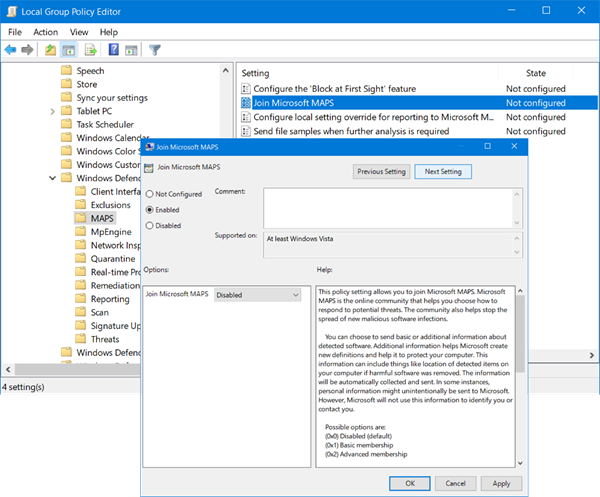
1] Join Microsoft Maps
To join Microsoft Advanced Protection Service, double-click on Join Microsoft Maps. In the Properties box which opens, select “Enabled.” You have 3 options here – Disabled, Basic membership and Advanced membership.
2] Configure Block at First Sight feature
After joining MAPS, you can double-click 0n Block at First Sight and select Enabled in its Properties box.. This feature requires these Group Policy settings to be set as follows: Join Microsoft MAPS must be enabled, the Send file samples when further analysis is required should be set to Send safe samples or Send all samples, the Scan all downloaded files and attachments policy must be enabled and the Turn off real-time protection policy should NOT be enabled.
3] Configure local setting override for reporting to Microsoft MAPS
The Configure local setting override for reporting to Microsoft MAPS setting will let users take precedence over the Group Policy thus eventually allowing them to override the same. You need to double-click on it and select Enabled in the Properties box which opens. Once this feature is enabled it will run checks in real-time and will decide on whether to allow the content to run or not.
4] Send file samples when further analysis is required
The Send file samples when further analysis is required setting will let you send all the samples automatically to Microsoft for further analysis. You need to double-click on it and select Enabled in the Properties box which opens. Having done this, you can move on to set the Cloud protection level for Windows Defender.
5] Select Cloud Protection level in Windows Defender
The cloud protection level too can be enabled by using the Group Policy by visiting the following path: Computer Configuration > Administrative Templates > Windows Components > Windows Defender Antivirus > MpEngine In the right pane, you will see Select protection level. Double-click on it to open its Properties box and then choose Enabled. You will see two options offered: Select High blocking level and click on Apply. Read: How to enable and configure Ransomware Protection in Windows Defender.
6] Configure extended cloud check
Under the MpEngine settings, you will also see a Configure extended cloud check setting. If you wish, you may also Enable this setting TIP: Make Windows Defender protect you against Potentially Unwanted Programs too.
7] Enable & set Cloud Protection level to High using Registry
If you are a user of Windows 10 Home, then you can use the Windows Registry and tweak some settings. To do this, type regedit.exe in Start Search and hit Enter to open the Registry Editor. Now navigate to the following key: In the left side, right-click on Windows Defender, select New > Key and name the key Spynet. Right-click on Spynet and again select New > Dword (32-bit) and name it SpynetReporting. Set its value to 2 to set it at Advanced level. Now, again right-click on the Windows Defender key which appears on the left side and select New > Key. This time name the key as MpEngine. Next right-click on the MpEngine key and select New > Dword (32-bit) value. Name the key as MpCloudBlockLevel and give it a value of 2 to set it at High block level. Tools that may help you: