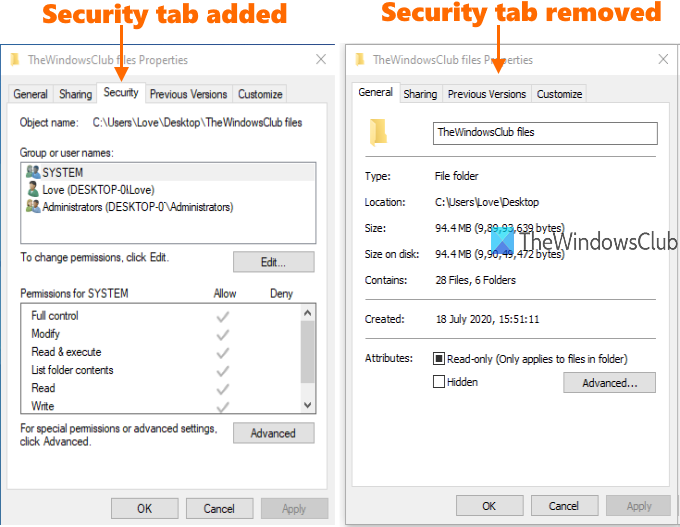
This post will help you add or remove Security tab in Windows 11/10 with simple steps. The image below shows the Security tab first enabled and then disabled from the Properties window of a folder in Windows 11/10.
Add or remove Security Tab from Explorer in Windows 11/10
If the Security tab is missing from the File Properties window, then this post offers two ways to add or remove Security Tab from Windows 10 File Explorer: Before you try any of these options, it is advised to create system restore point. It will help you recover from unwanted changes when something gets wrong.
Folder Properties not showing Security tab
1] Using Group Policy Editor
This option is handy for those who are using Windows 11/10 Pro, Education, or Enterprise edition. If you’re using Windows 11/10 Home, then either you should first add Group Policy to Windows Home edition or use the second option. To use this option, you need to open the Local Group Policy Editor window. When the window is opened, access File Explorer folder. The path is: User Configuration > Administrative Templates > Windows Components > File Explorer
On the right-hand part, you will see the list of settings. Scroll down and double-click on Remove Security tab setting, as highlighted in the image above. A new window is opened. There, select the Enabled radio button. After that, Apply the changes, and save using OK button.
Now access the Properties window of some folder/file. You will find that Security tab is removed. To add that tab again, just follow the above steps, use Not Configured/Disabled radio button in the Remove Security tab window, and save it. TIP: You can always reset all Local Group Policy settings to default in Windows 10.
2] Using Registry Editor
Registry Editor applies similar settings (as the above method) to add or remove Security tab. First of all, open Registry Editor window. After doing that, access Explorer key available under Policies key. The path is:
On the right-hand side of that Explorer key, create a DWORD (32-bit) Value using the right-click menu. Rename it as ‘NoSecurityTab’.
You can see the same in the image added below.
Now, double-click on that NoSecurityTab value. A small box is opened. In that box, set Value data to 1, and use the OK button to save this change.
It will remove Security tab from File Explorer. To enable the Security tab again, you can set Value data to 0 or simply delete the same NoSecurityTab key. That’s all. So, these are two simple and effective options to add or remove or enable or disable Security tab from File Explorer in Windows 10. Just follow the steps carefully and you will get the output.
Sharing tab is missing in Folder PropertiesNo Location tab in Folder Properties.
No Security tab in Folder Properties
If you do not see the Security tab in Folder Properties then you need to configure the Remove Security tab Group Policy setting or tweak the value data of the NoSecurityTab Registry key as mentioned in this post.
How do I get the Security tab in Folder Properties?
You need to Disable the Remove Security tab Group Policy setting or tweak the value data of the NoSecurityTab Registry key to 0 as mentioned in this post.