If you open the Disk Management, you will see two types of Recovery Partitions. One Recovery Partition has no drive letter and the other has a drive letter. The Recovery Partition that does not have a drive letter is created at the time of Windows installation. It holds the Windows Recovery Environment (Windows RE). Windows uses this Recovery Partition to boot into the Recovery Environment so that you could restore your system in case you are experiencing problems. Another Recovery Partition has a drive letter. You can also view this partition as a Recovery Drive in the File Explorer. This partition is created by the system manufacturer. It allows you to restore your system to factory default settings in case a problem occurs.
Which Recovery Partition you can delete?
The Recovery partition created by Windows has a size usually in Megabytes, whereas the Recovery partition created by OEM has a size in Gigabytes. You should not delete the Recovery Partition created by OEM. Windows can create more than one Recovery partition. This usually happens when you upgrade your system from an older version of Windows, say Windows 8.1 to a newer version of Windows, say Windows 10. After the upgrade, the older recovery Partition becomes useless. Hence, you can delete it safely by using the Diskpart utility.
You can run a command in Windows PowerShell to know which Recovery Partition is currently in use. Open an elevated PowerShell and type the following command. After that, hit Enter. After a few seconds, Windows PowerShell will show you the Recovery Partition that is currently in use. Now you can delete other useless Recovery partitions. Read: What is EFI System Partition in Windows 11/10?
How to delete Recovery Partition in Windows 11/10
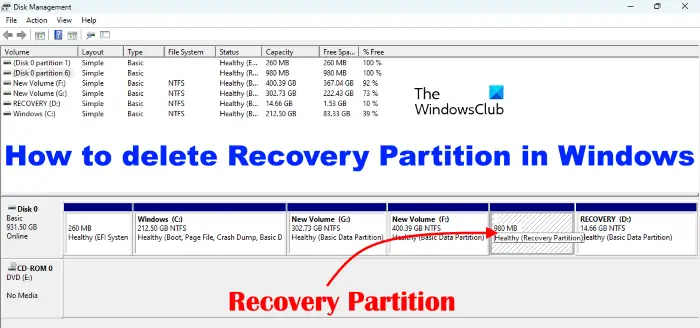
The Disk Management tool on Windows computers lets users manage the partitions on their hard disks. You can create new partitions and delete the existing ones using the Disk Management tool. When you right-click on a particular partition of your hard disk, you will see a number of options in the right-click context menu. But if you right-click on the Recovery partition, you will see only one option, Help. Hence, it is clear that you cannot delete a Recovery Partition using the Disk Management tool. Instead, you have to use the Diskpart utility. Diskpart is a command-line tool that lets users perform different operations on their hard disk and disk partitions. The steps to delete a Recovery Partition in Windows 11/10 using the Diskpart utility are written below. But before you proceed, we recommend you create a system repair disc. This system repair disc will help you recover your system.
Read: How to Merge or Delete an OEM Partition in Windows 11/10.
Can I delete the healthy Recovery Partition?
Disk Management is a tool that shows all the partitions on a hard disk. Some of you may see more than one healthy Recovery Partition in the Disk Management tool. This usually happens when you upgrade your system from one version of Windows to another version. In this case, you can delete the useless healthy Recovery Partitions.
To know which Recovery Partition is currently used by Windows, you can run the following command in Windows PowerShell (Admin). Fix: Multiple Recovery Partitions in Windows 11
How to delete a partition that won’t delete?
If you are unable to delete a partition from your hard disk, disable the paging file and check if it resolves your problem. If not, you can use third-party software to delete the partition. Hope this helps. Read next: How to free up space on Recovery Drive if it is full in Windows.