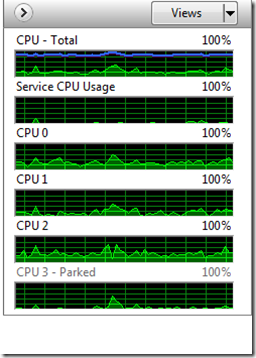
The state of individual parked CPU cores can be observed in Resource Monitor under the CPU tab, on the right side.
If you are using some new multicore Intel CPU like i7, you will notice that some of the cores are marked as parked. This is a new feature of Windows OS, and it helps in optimizing the energy consumption of your CPU. Sometimes, by adjusting the Core parking by the performance of the PC, you can even reduce micro-shutters that occur when playing a game or using some resource-heavy. This new feature of Windows manages Core parking well, but if you want, you can tweak it to suit your requirements. Core packing on Windows 10/8/7 now is pretty good, but by tweaking it according to your needs can make it even better.
Enable or Disable Core Parking in Windows 11/10
There are three utilities that may help you:
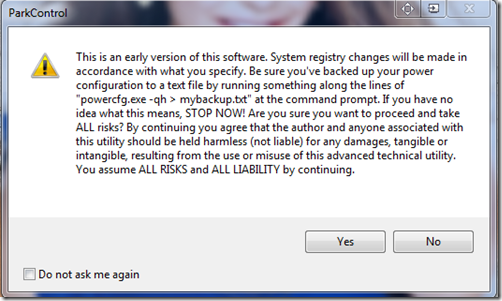
1] Park Control
Using Park Control Utility, we manage our Core Parking percentage instead of registry tweak or reboots. It’s a very simple tool not much explanation needed. Remember this tool works only on new generation processors like Intel’s I series or AMD Bulldozer platform. When you first open it, you’ll get a warning about the application.
Make sure you create a backup of your Power Configuration. To do so open up a command prompt and type in: Once you click “Yes” it will take you to the application.
Here you can choose the power plan. Next under “CPU Parking” for “On AC” or “On Battery” you can click on “Enable” to enabled it and entered the % of core you want to enable. Once you’re done click on “Apply” and click “OK” now you can go to Resource Monitor and click the CPU tab to verify if Core Parking has been enabled. You can download the application here.
2] Manage Parked CPUs
This utility will allow you to easily enable or disable core parking for your CPU. Run the tool and click on Check Status. Core parking may not be enabled for all the CPU’s, even though the registry value may indicate that the cores are parked. From now you can press “Park All” or “Unpark All” buttons to enable or disable parking. You can get it here.
3] Disable CPU Core Parking Utility
Disable CPU Core Parking Utility not only lets you enable or disable it, but also allows you to adjust the CPU Core Parking slider to anything from 0 to 50%. You can download it here. If you are looking for a hotfix that will selectively disable the Core Parking feature in Windows 7 or Windows Server 2008 R2, visit KB2646060. I can’t stress enough – do it at your own risk – and that too if you know what you are doing. And please create a System Restore point before you make any changes so you can revert if need be. Read next: What is Processor Affinity & how to set Processor Affinity on Windows 11/10.