How to limit CPU usage for a process in Windows 11/10
In simple terms, CPU utilization is the current percentage of CPU resources consumed by all programs. If you notice that some programs are using more of your CPU cores and hogging system resources, you can limit CPU usage for the process or multiple processes of the game/app using the methods below. Let’s see these methods in detail.
1] Set Process Priority and CPU Affinity
Process Priority enables Windows OS to allocate and de-allocate resources required by all the active processes. PC users can alter the process priority of any process/sub-process via Task Manager, but it should be done only for non-system processes. The process priority settings of the core system processes are best left unaltered. CPU Affinity simply restricts the processes to use fewer CPU cores of your system. PC users can set for each process to control how many CPU cores a process is allowed to use. By changing CPU affinity, you can free up CPU cores which will become available to other processes. To set Process priority, do the following:
Press Ctrl + Shift + Esc key to launch Task Manager.In Task Manager, identify the process whose priority you want to alter.You can also click on the CPU column to arrange the processes in descending order of their consumption.Now, right-click on the process and select the Go to details option from the context menu. Alternatively, click the Details tab and look for the process you want to alter.On the Details section, right-click on the process and select the Set priority from the context menu.Then, select Below Normal (allocates slightly fewer resources when they are available) or Low (allocates the least amount of system resources when they become available).A warning window will pop up informing you about the effects of changing the process priority.Click on the Change Priority button to apply changes.Exit Task Manager.
To set CPU (Processor) affinity, do the following:
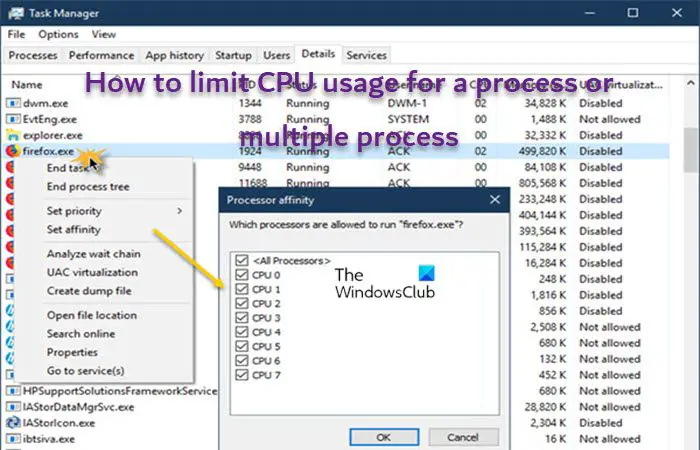
Note: For apps that has multiple processes such as msedge.exe, you will have to set the CPU affinity for each of the processes since each executable represents a different tab, window or plugin.
Open Task Manager.In the Task Manager window, click on More details to expand if you can’t see any tab but only a few apps with little to no information.Under Processes tab, click on the app you want to limit its CPU usage to expand the list of processes the app is running.Next. right-click on the process you want to limit, and select Go to details. to be redirected to the Details tab.In the Details section, right-click on the highlighted process and select Set affinity.In the Processor affinity window, by default, for most processes, you should see all processors are selected, which means all processor cores are allowed to run the process.Now, simply uncheck the boxes of CPU cores that you don’t want the process to use.Click on the OK button.Exit Task Manager.
Remember that you can limit only one or multiple CPU cores for a process, but at least one core has to be selected. Also, with this method, Windows will reset the configuration after you close and open the program to its default which is to use all CPU cores. So, to force an app or game to always retain the allowable CPU cores (CPU affinity), you can use the workaround below. Read: Can’t set Process Priority in Task Manager of Windows Permanently set CPU Affinity and Priority by creating a shortcut for the process
You begin by determining the hex value of the CPU(s) you want to use for CPU Affinity parameter by getting the binary number of the CPU cores you want to use for a process.
The length of the binary number is determined by how many CPU cores you have. In the CPU binary number, 0 means “off” and 1 means “on”. For each CPU core you want to use for the process, change 0 to 1. For this post, we are demonstrating with 7-core CPU and will be using only CPU 0 for the application; the binary number to be used will be 0000001.
Next, we need to convert the binary to a hexadecimal number using the converter at rapidtables.com/convert.Once you have the hex number, proceed to create a desktop shortcut.In the Create shortcut window, enter the syntax below in the Type the location of the item field.
In the syntax, substitute the ProgramName placeholder with the actual name of the program (can be empty or any name), Low with any CPU priority (Realtime, High, Above Normal, Normal, Below Normal, Low), # with the Hexadecimal value obtained earlier, ProgramPath with the full path of the game or application.
Now, after you have created the shortcut, if you want to run the program, run this shortcut instead, and Windows will automatically launch the program with the CPU affinity and Priority you’ve set in the shortcut’s command parameters. But, keep in mind that this method will only work for apps and games that run on only one process. For apps that run on multiple processes, such as chrome.exe, firefox.exe, or msedge.exe, you need to force set the priority and CPU affinity by following the workaround below. Read: Change Process Priority for running processes using Command line Permanently set CPU Affinity and Priority by creating PowerShell script for the process
You begin by creating a PowerShell script.Create a text file and name it any name you like but with an extension of .ps1.Once created, open the .ps1 file with Notepad or any other compatible text editor.Enter the syntax below in to the text editor:
Substitute chrome.exe with the name of the process you want to set priority for, and the priority value (Realtime 256, High 128, Above Normal 32768, Normal 32, Below Normal 16384, Low 64) in the SetPriority(value).Now, you need to determine the decimal value of the CPU core(s) you want to use for a process. As you’re using the same CPU cores above, check the decimal value in the converter above.Now, if you want to set the CPU affinity for only one process, enter the command line below into the PowerShell script.
To set the CPU affinity for all processes with the same name, for example, chrome.exe, firefox.exe or msedge.exe, enter the command line below into the PowerShell script.
Substitute the value 1 with the decimal value you obtained from the converter, chrome with the name of the process you want to set the CPU affinity for.Save the text editor.To run the script, right-click the file and select Run with PowerShell.
By default, Windows does not allow any script to run on the system. To allow your script to run, tsp Y when prompted. The script will then run and exit after executing all the commands. If you encounter any problem running the script due to execution policy, you can turn on PowerShell script execution or you can create a desktop shortcut pointing to the ps1 script you’ve created earlier with parameter that bypass the execution policy using the command below in the Type the location of the item field:
Substitute the FullPathToPowerShellScript placeholder with the actual path to your PS1 script file. If your Windows is not in C: drive or your powershell is installed elsewhere, replace the C:\Windows\System32\WindowsPowerShell\v1.0\powershell.exe with the path to the powershell.exe on your system.
Read: Configure Processor Scheduling for better performance in Windows
2] Use third-party app
This method also solves the drawback of using Task Manager to limit CPU usage, which is, it resets your preferences after the program restarts. So, If you want a more comprehensive solution to manage the resource usage on a program, you can try third-party apps like Process Lasso, Bill2 Process Manager, and Process Tamer. To limit the CPU usage of a process using Process Lasso, do the following: Note: If you plan on making major tweaks with this utility or any other mentioned, we suggest you create a restore point before you proceed.
Download and install the appropriate version of the utility on your system.Next, launch the application with elevated permissions.Right-click on the desired process and change its priority and affinity as per your requirement.Make changes by selecting the Always option from the context menu. If you choose the Current option, it will only be applicable until the program restarts.Once done, you can exit the app.
Read: How to Enable or Disable CPU Core Parking in Windows
3] Lower Maximum Processor State
This method is not as invasive as the two methods described above. This setting allows you to limit the maximum speed your CPU can attain which will consequently put less task on your processor and can potentially prevent your PC overheating. To lower the Maximum processor state of your CPU, do the following:
Open Control Panel.Click Power Options.Click on the Change plan settings option located next to the active power plan of your system.Then click on the Change advanced power settings. A new Power Options window will launch.Find and expand the Processor Power Management option.Click on the Maximum processor state option and edit the values.By default, the value is set at 100 percent. Change it to 80 percent for both the On Battery and Plugged in options.Click Apply > OK to save changes and exit the window.
With the above configuration, your CPU will run at 80 percent of its capacity during peak loads. That’s it! Related post: How to Check, Lower or Increase CPU usage in Windows
How to allocate more CPU to a program in Windows 11/10
CPUs are not allocated to programs. Programs create threads of execution that run simultaneously. Different CPUs support a different number of threads they can execute simultaneously. If the program creates several threads same or more as a maximum number of threads supported by the CPU it may consume more CPU.
Can I limit CPU usage of a process?
The easiest way to limit CPU usage of a process on a Windows 11/10 computer is to limit Processor power. Go to Control Panel. Maximum Processor State and lower it to 80% or whatever you want. Using software that measures CPU temperatures like ‘Speed fan’, you will see that temperatures drop.
Why is Task Manager CPU usage so high?
The worst scenario for high CPU usage when nothing pops up in Task Manager is a virus infection or malicious software that runs in the background. To stay safe from any ransomware or other type of viruses that can lead to computer damage, make sure Windows Defender is updated and running or you can install any reputable third-party AV. Read: CPU usage spikes to 100% when opening Task Manager
Should I enable all cores in Windows 11?
They are only used when required to speed up the tasks. However, you can manually enable some or all of them. If you think that your computer is performing slow and can do better, you can manually enable all cores so the workload between them is divided, resulting in faster performance.
What does 400% CPU usage mean?
On a multi-core Unix / Linux computer, 100% utilization indicates that only one of the cores is maxed out. 150% utilization indicates that only 1.5 cores are at capacity. So, for example, on an 8-core box, 400% utilization leaves you with twice the headroom that you are actually using.
What is a good CPU usage percentage?
The best CPU usage would most likely be around 80-80% max. This means you are utilizing more of your CPU’s capabilities while giving it some leeway to handle a spike in CPU usage.