With Windows 11/10, things changed again. Does this mean mouse users will have a tough time with Windows? The answer is yes… and no. It will always be easy to navigate Windows using the mouse. You will have to learn a few new tricks. But once you learn it, the mouse is as good as a touch screen.
How to use the Mouse on Windows PC effectively
We have already covered several posts on learning Windows. In this article, we will talk about how to use the mouse in Windows 8. We will cover the most basic functions and how to invoke them using a mouse in Windows. Once you get a feel of it, Windows is good with mouse-based navigation too.
Hotspots In Windows For Mouse Navigation
Though it removed the Start button in Windows 8, Microsoft added certain hotspots to the display. These hotspots help you in navigating Windows 8 using a mouse. The following sections talk about the main hotspots on the Windows 8 screen.
Screen Edges – Moving Start Screen Left Or Right In Windows
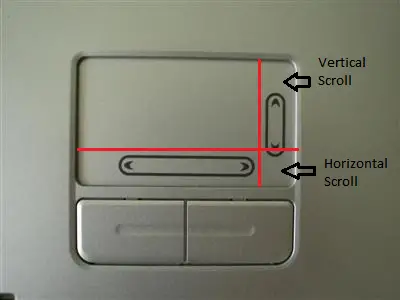
I first noticed a similar feature one year back when the designers of iegallery.com changed their website to a horizontal layout. In the absence of scroll bars, one had to move the mouse pointer to the left or right to scroll in that direction. Though the iegallery.com now contains all vertical pages, the feature of positioning mouse pointers to be left or right of the screen for scrolling in that direction can be seen in Windows. To scroll through the Start screen, all you need to do is to place your mouse cursor over the tiles. This will bring out a horizontal scroll bar at the bottom of the screen. Though you may not use the scroll bar, you can simply place the mouse pointer on either side of the screen to scroll in that direction. For example, if you wish to navigate to the right of the Start screen, move your mouse pointer towards the right edge of the screen with the scroll bar visible at the bottom. You can relate this scrolling to your notebook’s touchpad if it supports EdgeMotion. When you keep on moving your finger in a direction, and it reaches the edge of the touchpad, your screen continues to scroll in that direction. The same applies in the case of the Windows 8 Start screen. However, unlike EdgeMotion, you cannot define the scroll regions on the screen.
Scrolling the Start screen to the right and left can also be achieved using your mouse wheel. Pressing PgUp and PgDn keys, too, produce the same effect.
Move Between Start Screen & Last Used App In Windows
The bottom-left hotspot lets you move between the Start screen and whatever app you were using last. With an app open, if you move your mouse to the bottom-left corner of the screen, you will see a thumbnail of the Start screen. Click on the thumbnail to go to the Start screen. When on the Start screen, if you move the mouse pointer to the bottom-left corner of the Windows screen, you will see a thumbnail of your last used app. Click on it to activate that app. This may prove especially useful to switch quickly between the Start screen and Desktop mode as the latter is considered an app in Windows.
Switching Between Tasks In Windows Using Mouse
Another important hotspot is at the top-left corner of the Windows screen. When you place your mouse cursor at the top-left corner, Windows will show you a thumbnail representing the last app you were working on. Move the mouse pointer slowly towards the bottom, and Windows will start showing you other thumbnails of apps in the order of their usage. You can click on the thumbnails to go switch to that application.
Performing Semantic Zoom Using Mouse In Windows
Semantic zoom is the feature that lets you zoom the Start screen in or out. Placing your mouse cursor at the bottom-right corner of Start Screen shows you a magnifier glass. Clicking on the magnifier icon will zoom in or out your screen. You can also use your mouse wheel to perform Semantic Zoom. Press the CTRL key and use the mouse wheel to zoom in and zoom out. This is similar to the feature where we can press CTRL and use the mouse wheel to increase or decrease the font size of websites. See how to change mouse scroll speed in Windows.
Close Apps In Windows Using Mouse
Closing an app is easy in Windows. The apps are designed to close automatically if you are not using them. But since you would want to make sure you closed it, drag the app tile towards the bottom edge of the Start screen. The app will initially fade and then vanish into one of the Start screen tiles. Another method to close apps in Windows is to make use of the top-left hotspot of the screen to view app thumbnails and then right-click on the thumbnail to close it.
Rearrange Tiles In Windows Using Mouse
Use the wheel to make the app tile visible on the Start screen. When the app tile that you wish to rearrange is visible, right-click and drag it to rearrange. It will be easier if you zoom out the Start screen using the bottom-right magnifier.
Run Two Apps In Split Screen Mode Using Mouse
Position your mouse cursor on the top-left or bottom-left hotspot of the Start screen. When the app’s thumbnail appears, drag it to one side of the screen – to the left or to the right. The app will snap to that side. You can then resize the app by dragging its handle (shown by three dots on the line separating your screen). I hope this helps you use the mouse effectively and efficiently in Windows 10. I covered only the essential ones that I think you will need to practice before actually deploying Windows on your home or office network. In case you know anything more about using the humble mouse in Windows, please do share it with us in the comment boxes. Go here if you are looking for more Computer Mouse Tricks For Windows.